OtsAV Radio is a software targeted at broadcasters, webcasters, and businesses that need dedicated playout software with advanced automated mixing. Learn how to install OtsAV radio and broadcast to your radio server.
Software information
Platform: Windows
License: Requires a license (Free 30 day trial)
Server type: Shoutcast may need an external encoder
Download Page: https://otsav.ots7.com/download-otsav-free-trial/
About OtsAV Radio
OtsAV Radio is fully capable of handling your radio automation needs. It comes with an advanced playlist generator with the ability to set rules for song selection.
You can use its advanced automated beat mixing to mix songs like a professional DJ based on the song’s BPM.
For instance, with the Automated Beat Mixing enabled, the program will mix a song with a BPM of 115 to another with a BPM of 120.
It also supports video mixing. The OtsAV Studio that comes bundled into the trial software you download introduces an innovative way to create media files. Named Ots files, they can contain more information than standard mp3 files such as support for high-quality album covers.
Its scheduling and logging features are also well suited for internet radio broadcasters. For instance, using its logging feature, you get two log files. One has items that were actually heard on the radio, not items that may have been cued but never played.
The scheduler can even generate playlists from saved templates. It also supports manually mixing or attended broadcasting.
There is a scratching feature just as in a DJ program. If you’re running the software at an on-site installation, the program also supports remote access control.
The only point of contention is that it’s a bit dated and could use an update for the current decade.
How to Setup with OtsAV Radio and Stream to Radio Server
1.Install OtsAV Radio
OtsAV Radio gives users the chance to try out their software for 30 days. During this time, you can test out all aspects of the program. However, an announcement that informs you to purchase the program will be played occasionally.
Getting started is easy:
- Download the setup exe file
- Launch the installer and follow the prompts.
The installation is quick, as there is no need to configure databases.
2. Set up the Encoder in OtsAV Radio
The first option entails using the Shoutcast DSP Plugin. You’ll need to download the Winamp Shoutcast DSP (to get the dsp_sc.dll file).
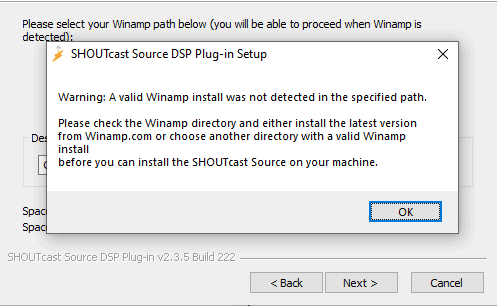
Now, we tested the latest Shoutcast DSP version 2.3.5 but couldn’t get it to take the bait and install its files under OtsLabs\Winamp. Here is a screenshot of the error.
The Shoutcast DSP version 1.9.0. had no issues installing its files under the OtsLabs directory. You can download the plugin setup file here: https://shoutcast-dsp-plug-in.en.softonic.com/
- Launch the installer and choose the directory you installed OtsLabs. For instance, it may be C:\OtsLabs\Winamp
- Finish the installation, and let’s configure the plugin in OtsAV Radio.
Here are the steps:
- Open the settings panel by clicking the program’s icon from the top left corner.

- Select Options -> Additional Output Options -> ShoutCast -> Set Plug-In
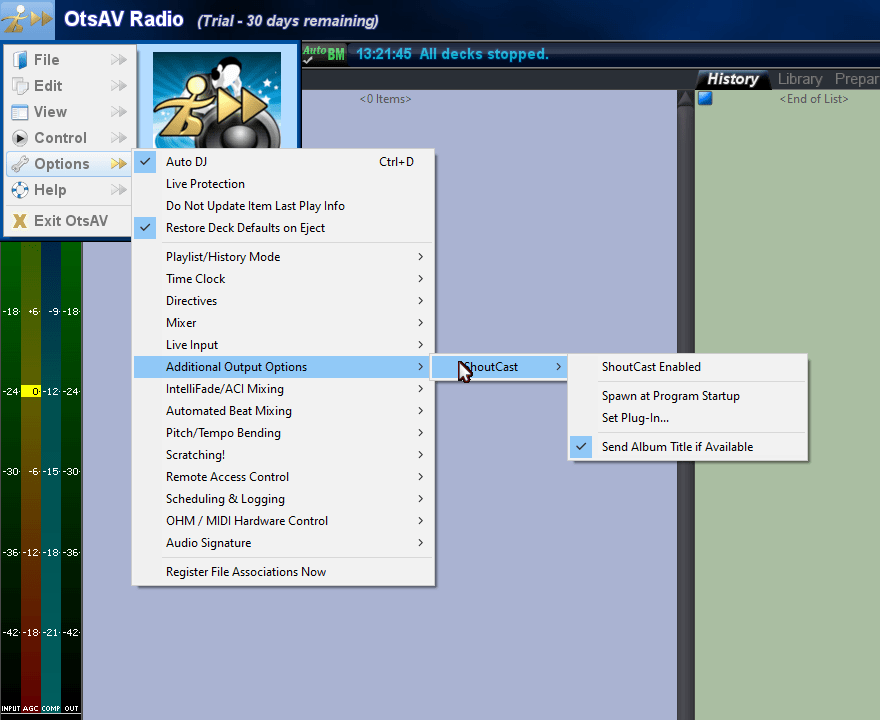
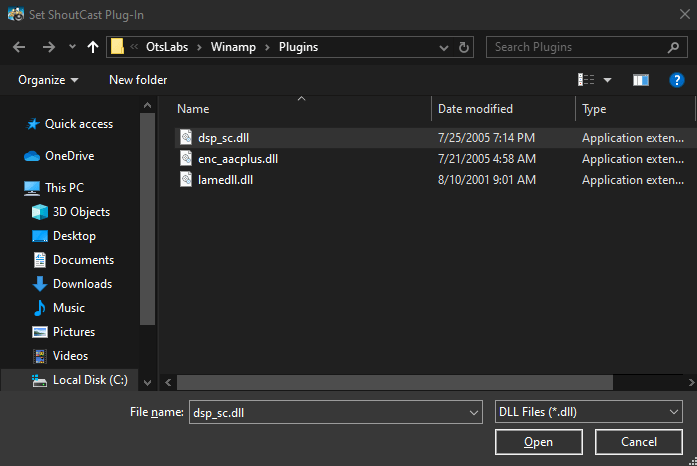
- Locate the dsp_sc.dll file and select open.
- Next, choose Options -> Additional Output Options -> ShoutCast -> ShoutCast Enable.
It will launch the Shoutcast DSP window that allows you to configure encoders.
For radios hosted on Cloudradio, you’ll find your server or connection details on the radio dashboard.
If you don’t have a radio hosting service, you can easily create Shoutcast or Icecast servers on our radio console.
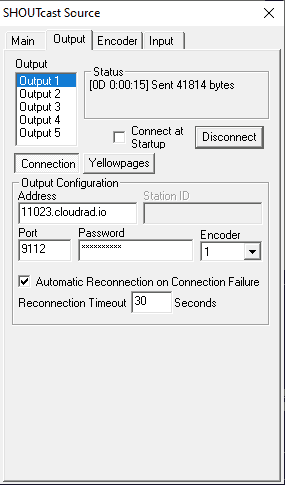
Shoutcast Encoder Setup
To set the server type to SHOUTcast 1:
Host: e.g. 11023.cloudrad.io
Port: e.g. 9112
Password: e.g. n3t8zdw0ka
What if the ShoutCast DSP Plugin fails to work?
Well, the supported Shoutcast DSP version was released in 2005. It’s dated and will deprive you of powerful encoder functions. Even while testing the program, it failed to send audio to the server. Consider that you’ll be limited to broadcasting on Shoutcast 1 since you’re using the Shoutcast DSP.
We recommend using an external standalone encoders with OtsAV Radio. You may get more functions, stability, and the ability to capture sound from different inputs.
What are the best encoders to use with OtsAV Radio?
The first setup involves using VoiceMeeter with BUTT. You can read our tutorial on using this option here.
Alternatively, you can find encoders that can capture sound directly from your sound card. Here are some options:
- Rocket Broadcaster - Paid with a free option (Guide)
- RadioCaster - Paid (Guide)
- PlayOut ONE LiveStream - Paid (Guide)
3. Broadcasting with OtsAV Radio
Fortunately, OtsAV Radio is easy to use. It comes with a simplified interface, but there are plenty of hidden features.
Here are more resources that will help you learn about the program:
- OtsAV Radio Documentation Page
- Scheduling and logging tutorial
- YouTube - Sheen Importing Music With Ots Studio
- YouTube - Sheen Using Ots Part 2
Need an alternative to OtsAV Radio? Explore over 20 radio automation, DJ, and encoder programs on our broadcast software guide.